Operational amplifiers (opamps for short) are a fantastic analogue circuit building block. While they were originally used for mathematical operations (hence the name) in early analogue computers, they are now mainly used for audio applications.
What is an opamp?
An op-amp or operational amplifier to be exact is quite literally an entire amplifier. They usually contain around 30 transistors as well as several resistors and capacitors. The operational part of the name comes from the later days of analogue computers where opamps were used to perform mathematical operations. For example, if you amplify something by a factor of 3 you have just done a multiplication operation. Similarly, addition, subtraction, integration, differentiation and division were all easily done by combinations of opamps, resistors and capacitors.
Opamps here and now
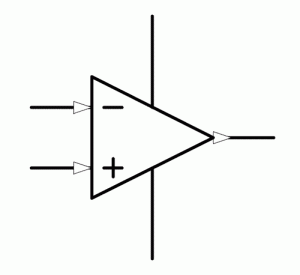
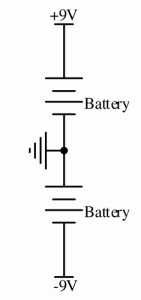
Now days, an opamp is similarly an entire amplifier, usually in a dual inline package or a surface mount equivalent, that is to say, an IC or “chip”. Figure 1 shows the schematic symbol for an opamp. It has 2 inputs, an output and power connections. Opamps are actually really easy to use and even the maths is easy when you know how. Read on, it really couldn’t be much easier! It is also important that you realise that to be useful in audio, rather than computers, we want to be able to have positive and negative voltages. It is all relative, or so the saying goes, in this case to what you consider to be your reference point. In the karaoke circuit, I use a VCC/2 or half the supply voltage as the point we go positive or negative from, but my actual zero reference is the ground point. This is because I used a single supply, to allow one battery to operate the circuit. For the purposes of this tutorial, I am using a split supply as shown in figure 2. Thus, we get +9V and -9V with a zero volt ground in the middle. Thus, for an ideal opamp, the output can go from -9V to +9V.
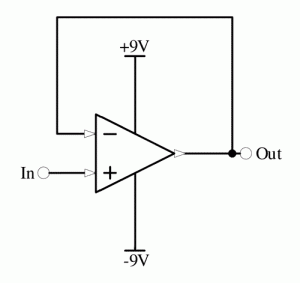
Configuration 1: The buffer
Figure 3 shows the simplest configuration, the buffer. All opamp configurations can be dealt with by the same simple maths. As long as you know that the amount of current flowing through the inputs is so small that we treat it as zero and provided there is NEGATIVE feedback, i.e. some path from the output to the – input, the opamp will usually fight to try and maintain the same voltage at the – terminal as the + terminal. From this, we can see that the outupt MUST copy the + input in the buffer to get the – input to be the same as the +. Pretty easy? Well that’s already one of the 3 main configurations!! But why would we want something that outputs exactly what it inputs. Well, we don’t want to interfere with the source, but want to deliver a bit of power, we can use the buffer as the input impedance of an opamp is very high, so it will not draw much power from it’s input but can deliver a lot more from it’s output. In other words, CURRENT amplification instead of voltage amplification. This is generally assumed, while voltage gain is usually calculated to explicitly be a certain value as you will see in the next 2 configurations.
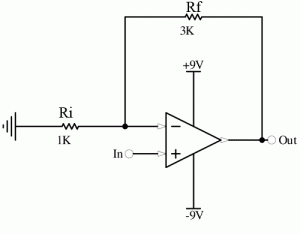
Configuration 2: Non-inverting amplifier
This is the most common configuration as it simply amplifies the input signal producing one whose voltage is a certain number of times bigger. Figure 4 shows how it is connected up. We will call the 3K feedback resistor Rf and the – input 1K resistor Ri. We said before that the inputs don’t draw any significant amount of current. We know that ground is zero volts and that the inputs try to be the same because there is NEGATIVE feedback through Rf. Thus, the voltage at the – input is equal to the voltage at the + input, i.e. our input signal that we will call Vin. For all the above to be true, there must be a voltage divider where Vin / Vout must equal 1K / (1K + 3K) so some simple algebra shows us that the output, Vout must be 1+(3K/1K)=4 times the size of Vin!!! You can either derive this or just remember it as a rule – non-inverting you just add 1 to the Rf/Ri.
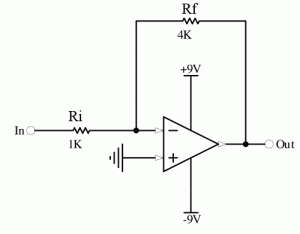
Configuration 3: Inverting amplifier
The inverting amplifier is very similar to the non-inverting, except that it performs an inversion so the output is the opposite polarity to the input. In other words, if we put 1 volt in, we get -1volt times the voltage gain out. Figure 5 shows the configuration. Notice the subtle difference. We put our input into the – input of the opamp and tie the + input to ground. We know that the – input must try to be similar to the + input due to negative feedback and we know that + input is at zero volts. Thus the – input is at zero volts, (known as a “virtual earth”). So (Vin-zero)/1K gives the current flowing in. Since the inputs of the opamp don’t draw current, it must go to the output. Say Vin is 1 volt. Then we have 1mA going in. To get 1mA to continue around through the 4K resistor Rf to the output, (required to obey electrical laws) we know that the output, Vout must be -1mA x 4K = -4V. The negative is to do with direction of current. There is -ve 1mA going into the -input point from the 4K resistor and +1mA going in from the 1K resistor. So Vout is -4V giving a voltage gain of -4/1=-4. Note that we needed a 4:1 resistor ratio to get a gain of 4 whereas the non-inverting amplifier needed a 3:1 ratio. This is because the gain of an inverting amplifier is -Rf/Ri. Remember, the negative is not a loss, it is still a gain of 4 but the opposite polarity.
That’s it! Easy. I learnt the Rf/Ri and Rf/Ri+1 equations years before I knew the simple maths and was able to build an audio mixer as a teenager based on this, incorporating about 24 opamps.
One thought on “Opamps”
Comments are closed.